
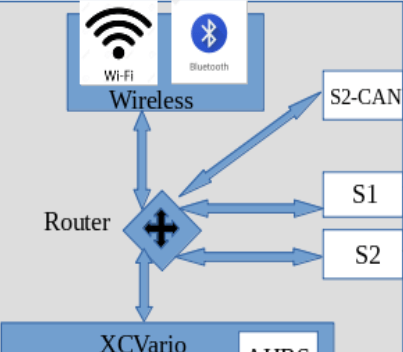
An important functionality of the XCVario is the integrated router function, which makes it possible to connect the data of the device and data from external devices between the various interfaces of the device. This results in a multitude of possibilities for using the XCVario and thus almost any extensions and possible uses are covered. An overview of this follows, further setups are conceivable and can be derived from the combinations shown.
It is generally recommended to switch off connections that are not required, as they unnecessarily occupy resources such as CPU and RAM, especially if there is no destination at the other end, the data accumulates, cannot be delivered and must be discarded. With a minimum setting for the routing, the full performance for the Vario operation of the device is available.
The routing of data that is sent to the XCVario from outside via any interface is always activated, i.e. the XCVario always reacts to FLARM and GPS data, commands, etc. without having to program a routing for this. For the XCVario data itself, i.e. the outward direction, the routing must be set accordingly for the interface. The XCVario data is also automatically routed to the CAN bus in the CAN mode master.
Configurations that require the CAN bus can therefore only be used from the current hardware series XCVario-22.
The configuration of the router is always bidirectional, i.e. both the forward direction and the reverse direction of the data streams are always connected.
Any of these ports can only ever be connected to one target bidirectionally. To setup the routing, see the “Routing” description in the setup chapter for the corresponding ports. The reverse direction is automatically configured, for example if we enable S1-RS232 as a target in the wireless interface routing settings, then at the S1-RS232 interface, the Wireless is enabled as well. The adjustment therefore only needs to be made at one end but is visible at both ends, means the routing setting appears in two places, and can be changed from either place, but it is the same setting.
XCVario, Wireless Navi and FLARM #

The most common application in the single seater is the following. This setting also corresponds to the delivery status, a wireless navigation device and a Flarm with IGC standard connection therefore run via plug and play without having to make any further settings. In this configuration, the XCVario data must be routed to wireless (WL), and the data on S1 which come from FLARM are also of interest on wireless, so that a GPS fix on the navigation system and also the traffic of other aircraft can also be included FLARM can be displayed, so these two switches are set to “Enable”. The interface S2 and the CAN bus are not required for this. For more information, e.g. where to find the routing dialogs in the setup menu, please refer to the Setup chapter. Its mostly the default configuration, so for this nothing is to be altered in the router setup.
Minimum setup:
| Wireless Routing | S1-Routing | S2-Routing | CAN Routing | ||||
| Port | Setting | Port | Setting | Port | Setting | Port | Setting |
| XCVario | Enable | XCVario | Disable | XCVario | Disable | XCVario | Disable |
| S1-RS232 | Enable | Wireless | Enable | Wireless | Disable | Wireless | Disable |
| S2-RS232 | Disable | S2-RS232 | Disable | S1-RS232 | Disable | S1-RS232 | Disable |
| CAN-bus | Disable | CAN-bus | Disable | CAN-bus | Disable | S2-RS232 | Disable |
XCVario, wired Navis and FLARM #

For this with a wired Navi like Kobo, OpenVario, IPX, etc, the data from FLARM to S1 must be routed to S2 (S1: S2-RS232 = Enable, or S2: S1-RS232 = Enable). The settings are made in the routing of S1 and S2, all other ports are not required in principle, but it can make sense to leave the wireless settings on XCVario and S1 enabled, so that a second device can be connected wireless if necessary, e.g. in the event of a power shortage for the permanently installed device, or in the event of a failure. It is also possible to read out the IGC file wireless with a mobile phone after the flight. The device wired to S2 can remain in the cockpit, a memory card or a USB stick for data transfer is then not required.
Front device minimum setup:
| Wireless Routing | S1-Routing | S2-Routing | CAN Routing | ||||
| Port | Setting | Port | Setting | Port | Setting | Port | Setting |
| XCVario | Enable | XCVario | Disable | XCVario | Enable | XCVario | Disable |
| S1-RS232 | Enable | Wireless | Disable | Wireless | Disable | Wireless | Disable |
| S2-RS232 | Disable | S2-RS232 | Enable | S1-RS232 | Enable | S1-RS232 | Disable |
| CAN-bus | Disable | CAN-bus | Disable | CAN-bus | Disable | S2-RS232 | Disable |
Two XCVario, two wireless Navis and FLARM #

For two-seaters and two wireless navigation systems, the following configuration is available, in which the main device is connected to the FLARM at S1 in the front, and the second display for the rear seat is connected via the CAN bus Data from the XCVario itself is transmitted to the second display via the CAN bus. Only the front device has to be hosed. This is the simplest configuration for two-seaters and only requires a 1:1 patch cable between the S2 interfaces of the front and rear units.
Front device minimum setup:
| Wireless Routing | S1-Routing | S2-Routing | CAN Routing | ||||
| Port | Setting | Port | Setting | Port | Setting | Port | Setting |
| XCVario | Enable | XCVario | Disable | XCVario | Disable | XCVario | Enable |
| S1-RS232 | Enable | Wireless | Disable | Wireless | Disable | Wireless | Disable |
| S2-RS232 | Disable | S2-RS232 | Disable | S1-RS232 | Disable | S1-RS232 | Enable |
| CAN-bus | Disable | S1-CAN | Enable | CAN-bus | Disable | S2-RS232 | Disable |
Secondary device:
| Wireless Routing | S1-Routing | S2-Routing | CAN Routing | ||||
| Port | Setting | Port | Setting | Port | Setting | Port | Setting |
| XCVario | Enable | XCVario | Disable | XCVario | Disable | XCVario | Enable |
| S1-RS232 | Disable | Wireless | Disable | Wireless | Disable | Wireless | Enable |
| S2-RS232 | Disable | S2-RS232 | Disable | S1-RS232 | Disable | S1-RS232 | Disable |
| CAN-bus | Enable | S1-CAN | Disable | CAN-bus | Disable | S2-RS232 | Disable |
Two XCVario, two wired Navis and FLARM #
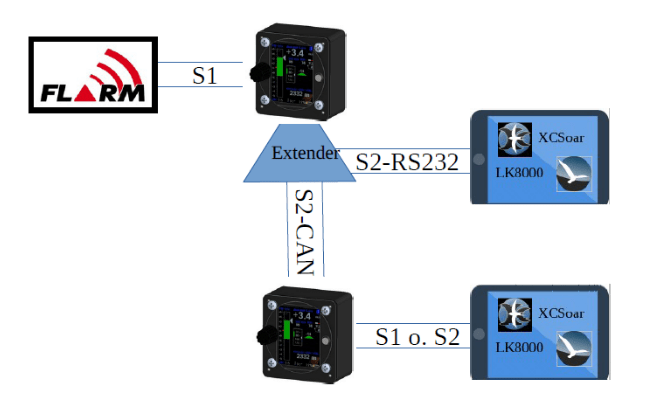
For two-seaters with two wired navigation systems, the picture is similar to the last configuration, the front navigation system can be connected to S2, the rear navigation system to S1 or S2. With a connection via S1 on the second device, the IGC-compatible Flarm port of the standard cable set is ideal if the device also has serial ports according to the IGC standard, or a connection to S2 with a 1:1 patch cable. In this case, the same routing settings “CAN” and “XCVario” as shown for S1 are to be made on the second device instead on S2. When connecting to S2 in the rear cockpit, use one of the extenders as shown in the front unit.
Front device minimum setup:
| Wireless Routing | S1-Routing | S2-Routing | CAN Routing | ||||
| Port | Setting | Port | Setting | Port | Setting | Port | Setting |
| XCVario | Enable | XCVario | Disable | XCVario | Enable | XCVario | Enable |
| S1-RS232 | Enable | Wireless | Enable | Wireless | Disable | Wireless | Disable |
| S2-RS232 | Disable | S2-RS232 | Enable | S1-RS232 | Enable | S1-RS232 | Enable |
| CAN-bus | Disable | S1-CAN | Enable | CAN-bus | Disable | S2-RS232 | Disable |
Secondary device:
| Wireless Routing | S1-Routing | S2-Routing | CAN Routing | ||||
| Port | Setting | Port | Setting | Port | Setting | Port | Setting |
| XCVario | Enable | XCVario | Enable | XCVario | Disable | XCVario | Enable |
| S1-RS232 | Enable | Wireless | Enable | Wireless | Disable | Wireless | Disable |
| S2-RS232 | Disable | S2-RS232 | Disable | S1-RS232 | Disable | S1-RS232 | Enable |
| CAN-bus | Disable | S1-CAN | Enable | CAN-bus | Disable | S2-RS232 | Disable |
Two XCVario wireless, two wireless Navis and FLARM #
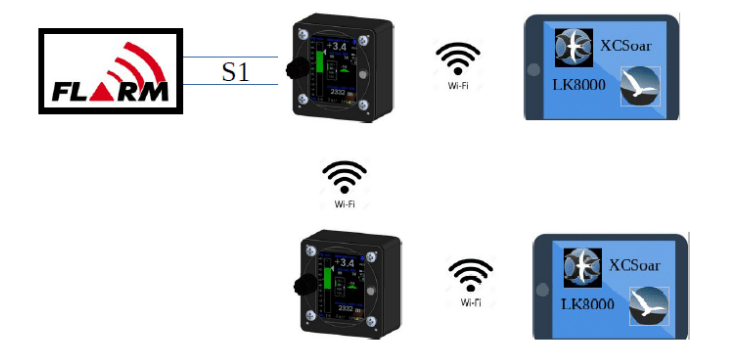
This configuration does not require any cabling between the front and rear devices. Both the navigation system and the two XCVarios can be coupled via WiFi. In Options / Wireless, the front device must be set as the wireless master and the rear device as the wireless client. Since Bluetooth and WLAN are only possible as alternatives, only the WLAN connection is possible, further details on this can be found in the Settings / Wireless chapter. The default for the routing can be used here. Only the setting for S1 on the first device is relevant, as well as the WL routing on both devices.
Front device minimum setup:
| Wireless Routing | S1-Routing | S2-Routing | CAN Routing | ||||
| Port | Setting | Port | Setting | Port | Setting | Port | Setting |
| XCVario | Enable | XCVario | Disable | XCVario | Disable | XCVario | Disable |
| S1-RS232 | Enable | Wireless | Enable | Wireless | Disable | Wireless | Disable |
| S2-RS232 | Disable | S2-RS232 | Disable | S1-RS232 | Disable | S1-RS232 | Disable |
| CAN-bus | Disable | S1-CAN | Disable | CAN-bus | Disable | S2-RS232 | Disable |
Secondary device:
| Wireless Routing | S1-Routing | S2-Routing | CAN Routing | ||||
| Port | Setting | Port | Setting | Port | Setting | Port | Setting |
| XCVario | Enable | XCVario | Disable | XCVario | Disable | XCVario | Disable |
| S1-RS232 | Disable | Wireless | Disable | Wireless | Disable | Wireless | Disable |
| S2-RS232 | Disable | S2-RS232 | Disable | S1-RS232 | Disable | S1-RS232 | Disable |
| CAN-bus | Disable | S1-CAN | Disable | CAN-bus | Disable | S2-RS232 | Disable |


